The problem Link to heading
We have all been there, our free cloud storage is getting full and it’s constantly nagging you to upgrade to the next tier. But, do we really have to?
Most of my google storage is used up by google photos, so I checked what was using up the most storage, and lo-and-behold it was Google photos.

Step 1: Accessing the damage Link to heading
Google provides a neat interface to sort your files by the largest, and for me the videos took the lion’s share. The default screen showed the top 100 videos file, so that’s as good as any place to start.
Step 2: What can I do about it? Link to heading
Sifting through the videos, they were not hugely important, but they were very nostalgic / sentimental. I didn’t actually want to delete them, and I cannot be arsed to do any offline backup. I don’t trust myself enough to not lose it, and the convenience of always accessible when it’s in the cloud.
So the next best thing is to do is download them (it was 5gb!), compress them, and upload it back to google photos, easy-peasy right?
Step 3: Learning how to brake Link to heading
After some quick research about how to compress videos, I landed on using Handbrake.
I downloaded my videos from google, fiddled around with the config a few times until I was happy with the file size to pixelated-ness.
As a sane person, I tested this with one file and uploaded it back to google photos, just to see that everything was kosher.
It was not.
Step 4: Google photo timeline Link to heading
The photo uploaded fine enough, but it was slotted in the timeline when the new file was created, as the compressed file outputted by handbrake is a totally different file. I wanted my travel photos to appear in the timeline when they actually happened, not when I decided to compress them.
So I looked around of some information on how google photo achieves this.
- https://support.google.com/photos/thread/20987042/my-photos-are-not-in-chronological-order-for-the-time-i-took-them?hl=en
- Supposedly EXIF data
- https://support.google.com/photos/answer/6128850?hl=en&co=GENIE.Platform=Desktop#zippy=%2Cchange-date-timestamps
- Manually edit the photo (or video in my case) through the UI
- No way in hell I was going to do this for 100 items
- https://www.reddit.com/r/ios/comments/qpz6jl/how_to_sort_transferred_google_photos/
- EXIF data, or date created by
- https://support.google.com/photos/thread/624111/what-property-does-google-photos-use-for-the-date-field-on-videos?hl=en
- quick time ‘CreatedDate’
Anyways, I tried all the above, and none of them worked to put the dam video in it’s original place.
I can’t find the original link I came across which put me on track, that said it was the ‘Media Created’ attribute on the file. IIRC, for macs it was using created date. Maybe it was claude / ChatGPT?
Step 5: Setting the dam attribute programmatically Link to heading
So the attribute looks like this.
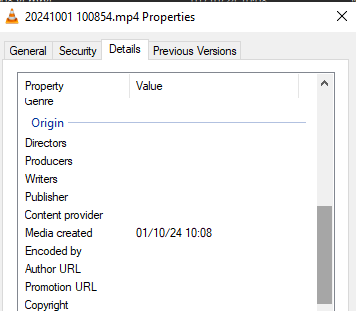
And it is not a normal attribute, it is a special windows attribute, and I wanted to bulk edit my 100 large video’s attribute correctly.
These were the two key links I found which were helpful, it was surprisingly hard to come across good information.
- https://stackoverflow.com/questions/31507038/python-how-to-read-windows-media-created-date-not-file-creation-date
- https://stackoverflow.com/questions/61713787/reading-and-writing-windows-tags-with-python-3
The python package pywin32 doesn’t work in linux / wsl, it only works when running running in a windows environment, which in hindsight actually makes a lot of sense, and I had to get used to using batch, it was real awkward.
Step 5: The results Link to heading
In the end, I freed up about 4.5gb (90% compression rate!) from 100 videos. However, was the time automating it worth?

But the real value is what I learnt along the way, which I have to sum up as
- programming in windows makes me cry
- learning and using batch makes me cry
- interacting with windows api makes me cry
- you should disable uploading of your original files from your phone, or it will just get uploaded again after you deleted them from google photos account 🙄
Code here: https://github.com/MrDopey/bulk-edit-windows-media-created/tree/master